
Getting Started with XML
This post introduces you to using XML data in eFORMz. It includes a sample and instructions on printing the sample to your printer.
Requirements: To complete these steps and print out the sample, you should already have eFORMz installed on your system and a network-connected printer to print to.
Overview: This sample XML project uses packing slip data in an XML file. The XML schema is very basic and contains packing slip data for only one order. eFORMz can accommodate a wide range of XML schemas. A typical operation in a production environment flows in this manner:
- The eFORMz Director watches a directory where shipping labels are saved, usually in ZPL format. Most shipping programs can output shipping labels in ZPL format.
- A ZPL file is picked up and processed using the eFORMz project that is named in the configuration (.cfg) file.
- eFORMz finds a unique identifier on the shipping label, such as a PO number in the REF field. eFORMz uses this value to determine the file name and location of the file that contains the packing slip data. The packing slip data is typically created by your WHM or ERP software. eFORMz can use packing slip data in a wide range of formats including XML, JSON, text, results of a database query, and web service calls.
- eFORMz renders the shipping label on the front and the matching packing slip on the back.
- eFORMz sends the output to the printer.
Information about how eFORMz integrates with different systems is available on YouTube.
Configure a Printer: This project is designed to print to A5 sized labels on a laser printer. You can modify the project to a different size or to print on a thermal printer. If you do not have A5 labels, you can change the project to print on 8.5” x 11” paper by completing the following steps. Changing the project to print on thermal labels requires resizing some document elements and is beyond the scope of this guide.
- To change the document size from A5 to 8.5” x 11”, right click the ShipLabel form in the Project window > Properties > General.
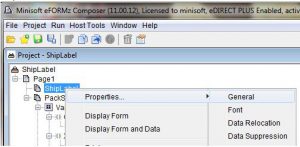
- Change the Page Size from A5 to Letter and click OK.
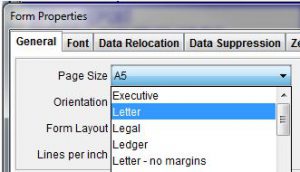
- Make the same change for the PackSlip form.
Complete the following steps to configure your printer:
- In Window’s Devices and Printers, open Printer Properties for the printer you want to print to. Make certain that the printer driver is Generic/Text Only. Printing to a printer with a PCL or other driver type produces unpredictable results.
- In the eFORMz Composer, click Host Tools > Local Director Toolkit > Printers.
- Click Add. In the Name field, type a name for the printer. This name is used only by eFORMz.
- Leave Media setting Default.
- Select the printer language to send to your printer. The following table shows typical settings:
| Printer Type | Language |
| Laser | PCL, Color PCL, or Postscript |
| Sato thermal | SBPL |
| Toshiba thermal | Toshiba |
| Zebra thermal | ZPLII |
- Click Add.
- Click the ellipsis button […] next to the Device field, select the printer you want, and click OK. The printer list comes from Window’s printers in Devices and Printers.
- Click OK in the two Printer Configuration windows.
- Click Save, click the Director tab, and then click Reload Printers Configuration.
You can find more information about configuring printers on YouTube.
Download and Open the XML Sample
- Download the XML Sample file.
- Extract the file to C:\Minisoft\eFORMz_6\Projects\Sample.
- Start the eFORMz Composer.
- Click File > Open Project, and select C:\Minisoft\eFORMz_6\Projects\Sample\XMLSample\ShipLabel.efz.
- You see the project and a shipping label shown in the Composer.
You can edit and preview output in the eFORMz Composer. This sample project includes the following files:
| File Name | Description |
| 151189882.xml | Contains packing slip data in XML format |
| 151189882.zpl | Contains the shipping label in ZPL format |
| MinisoftLogo.jpg | An image of the Minisoft logo |
| ShipLabel.efz | The main eFORMz project file |
| XMLSample.efz | The secondary eFORMz project file |
The data is loaded into the project this way:
- The main project file, ShipLabel.efz, opens and loads the shipping label (ZPL) file.
- The name of the XML file is passed with the LoadXML procedure to the secondary project file, XMLSample.efz, and the output from this project, including the Minisoft logo, is rendered on the back of the label.
The Composer has three windows: Project, Viewer, and Variables. The Viewer shows the incoming data on the left, and the outgoing data after it is processed on the right. The bottom of the Viewer has a tab for each form in the project.
Printing to a printer
Go back to the project you opened in the Composer to print it.
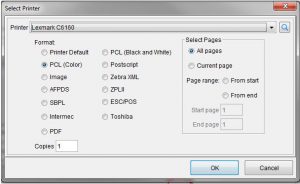
- Click Run > Print.
- Select the printer you configured.
- Click OK. Your invoice is sent to the printer.
Troubleshooting and other useful information is at support.minisoft.com. Many eFORMz videos are available on our YouTube and Vimeo channels.